
Once upon a time, there was a girl shorter than a hydrangea bush who asked her uncle how he turned the pink flowers blue. He told her he uses blue spray paint. Thirty-plus years later, she writes gardening guides.
Thankfully, hydrangeas are a little less mysterious to me these days, and by the time you’ve worked through these September tasks, they should feel a lot less mysterious to you too.
1. Identify Your Hydrangea Type
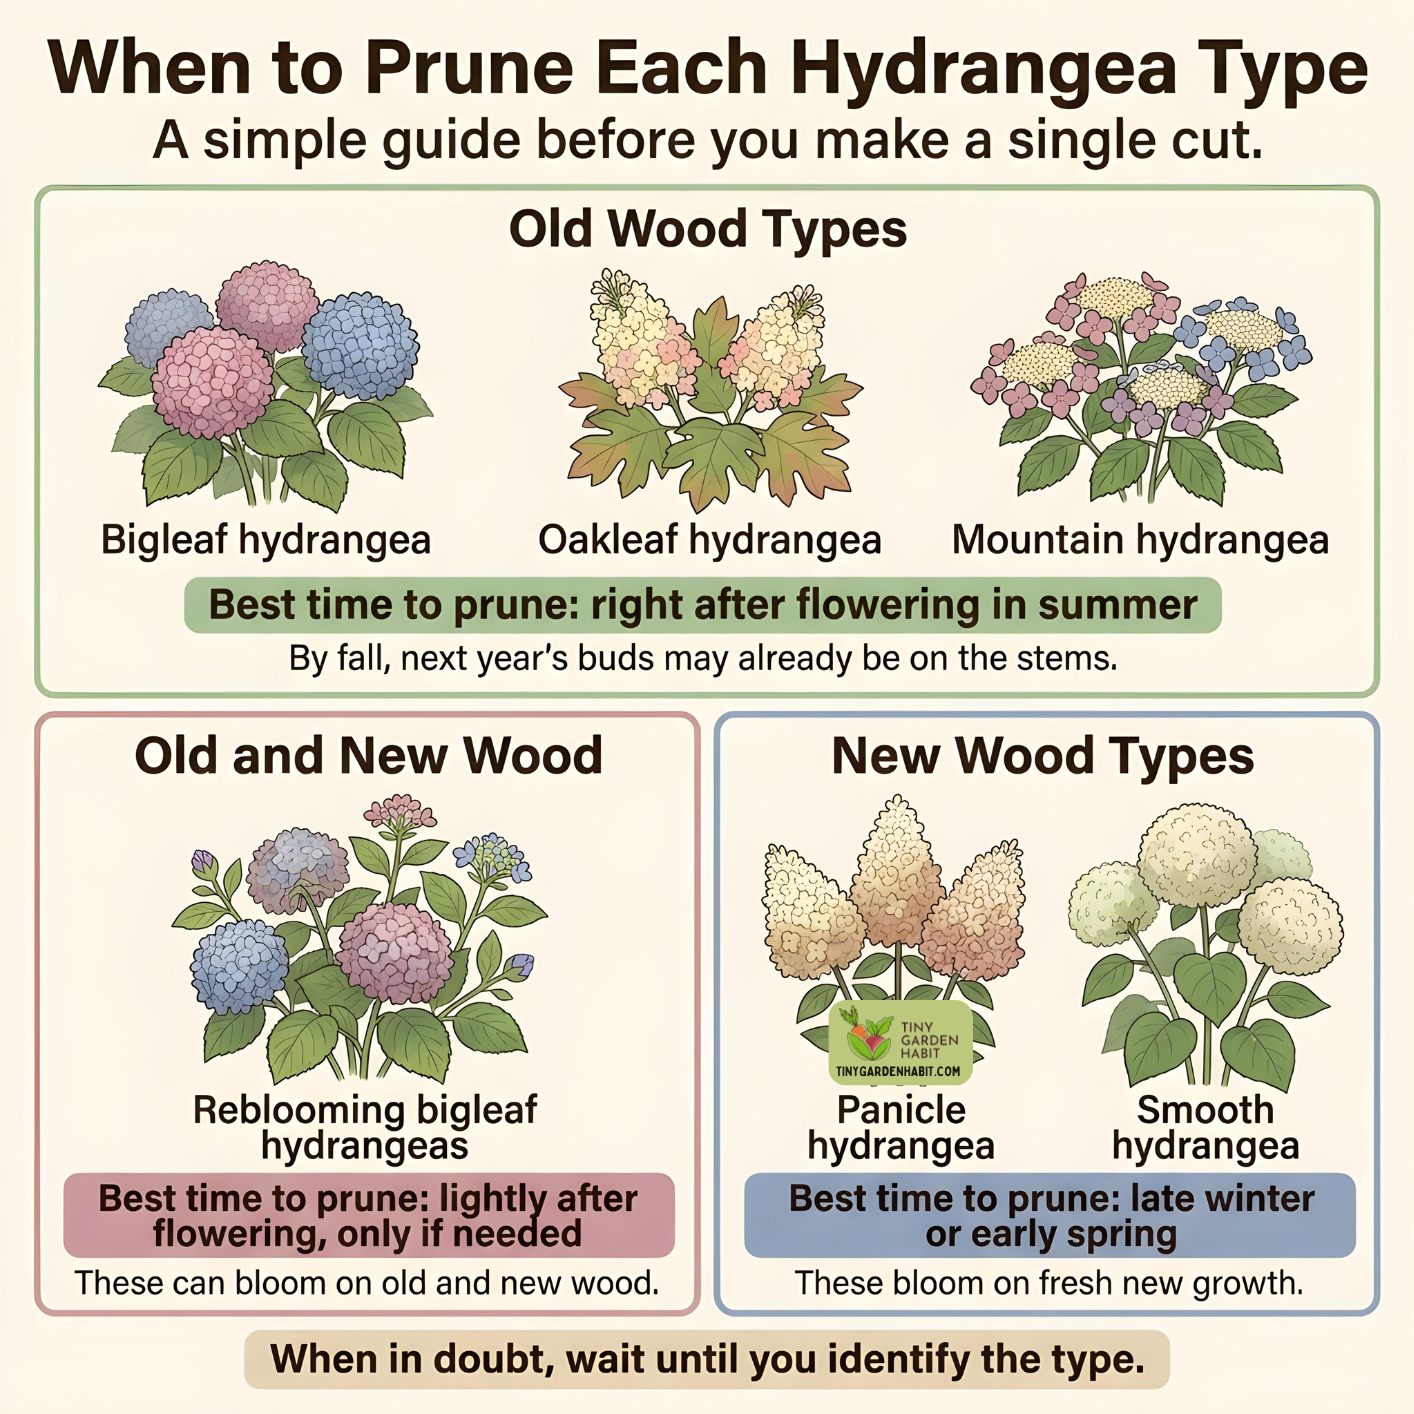
Before making a single cut this fall, determine whether your plant sets buds on old wood, new growth, or both:
Check plant tags, consult a real local nursery, or look up the cultivar before touching the plant. Unless dead, diseased, damaged, or badly placed wood needs removal, put the pruners away until you have a positive ID.
If you’re still unsure what gets cut and when, we explain how and when to prune each type of hydrangea in this guide.
2. Keep Watering if September Is Dry
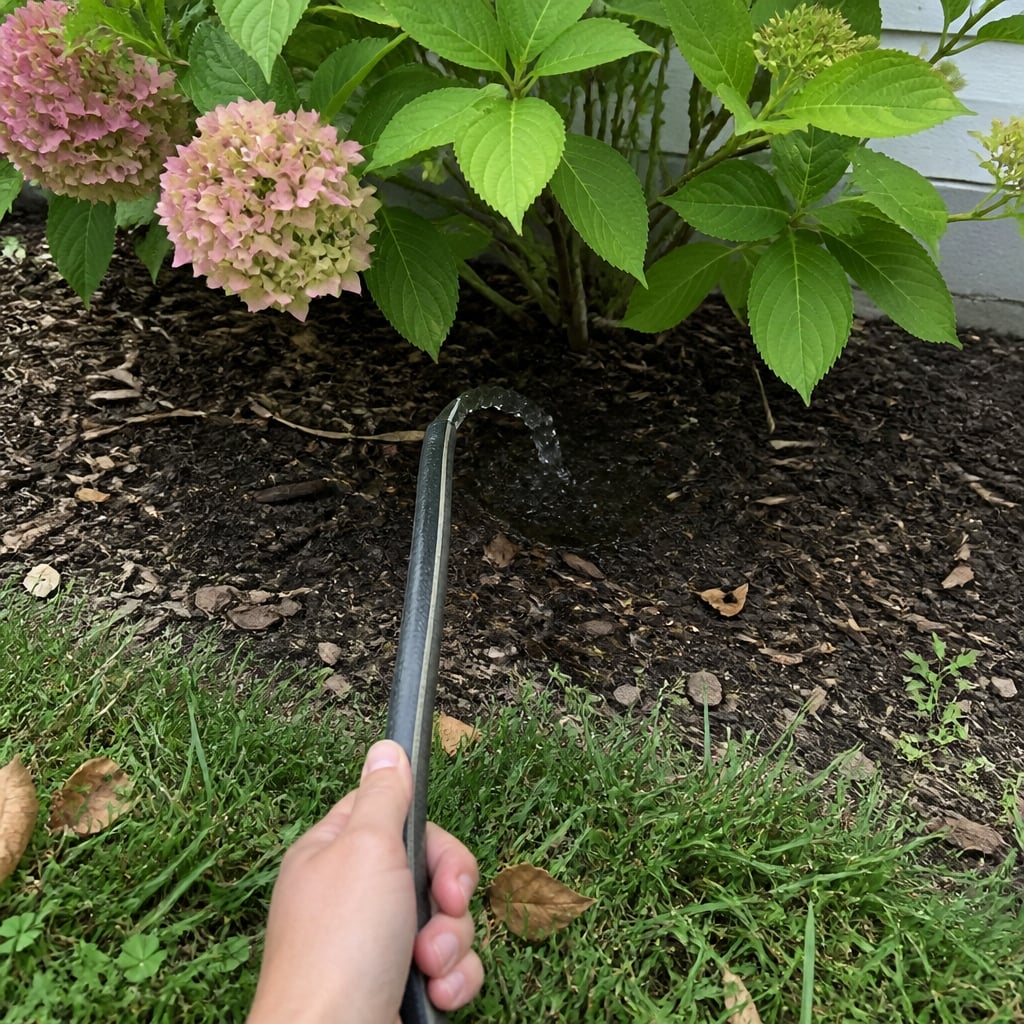
You may be tempted to turn off the hose in September because the air cools down. Huge mistake. The roots are still actively drinking, like my favorite uncle, and early fall dry spells can hit them hard.
Push a finger a few inches into the soil beneath the branches, rather than right against the main stem. If it feels dry down there, the hydrangea is thirsty underground.
Lay an open hose end on the soil beneath the branches (but not pressed against the stem!) and run a low trickle so the water slowly soaks into the ground instead of running off. Move the hose around the area beneath the branches if needed.
Watch out if your yard sits on heavy clay. If the soil is still wet from the last watering or rain, leave it alone. Turning the bed into an oil slick can suffocate roots fast, leaving a bundle of dead gray sticks to haul to the curb come spring.
Quick tip: Avoid aiming a spray nozzle at the top leaves, it does little for thirsty roots and can actually encourage fungal problems if the foliage stays wet.
And if September is still behaving more like summer where you live, we wrote a guide on 7 things hydrangeas need during hot summer weather.
3. Trash Infected Leaves
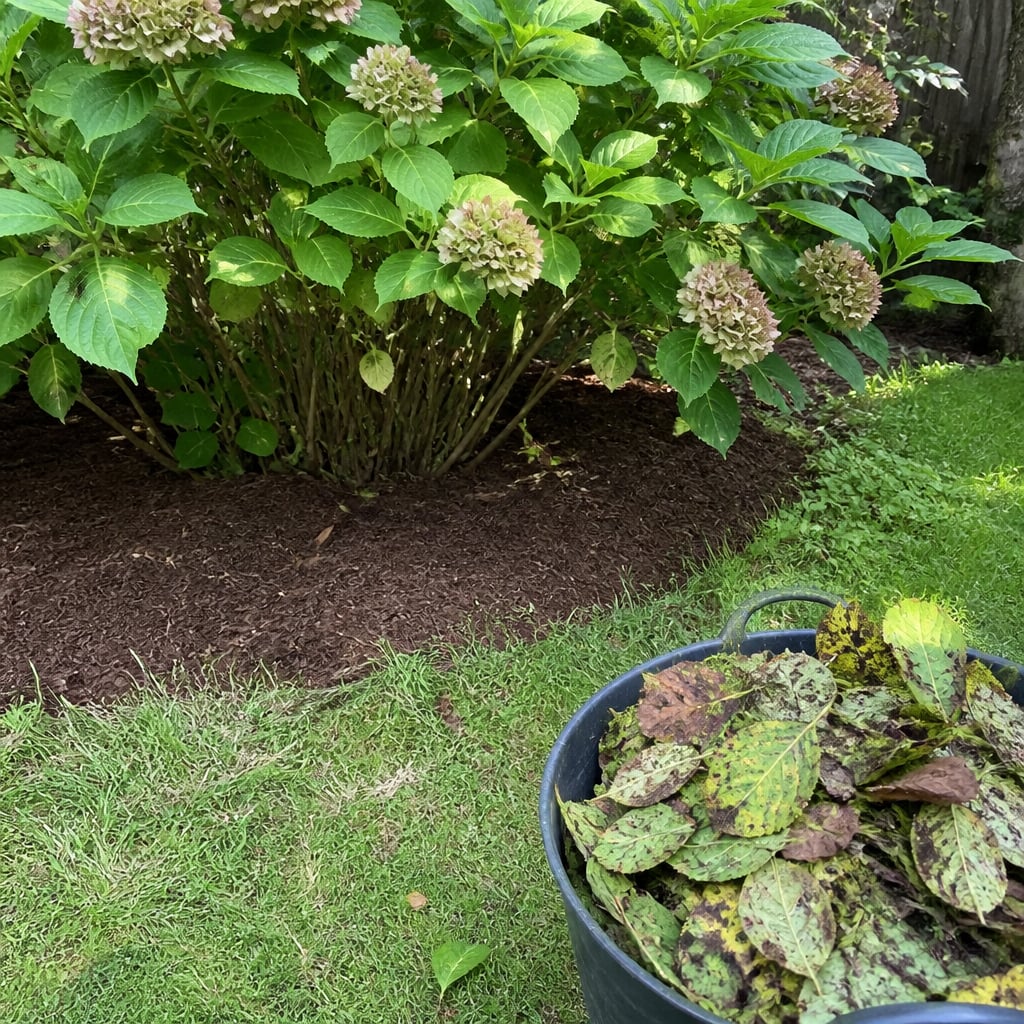
Are you one of those leaving fall leaf drop to “enrich the soil?” Doing that with infected foliage can set you up for the same hydrangea problems next year. Some fungal pathogens overwinter in dead leaves and plant debris, just waiting for spring moisture and humidity.
Rake up infected leaves and debris under the drip line and trash them. Your goal is to leave only healthy foliage standing.
Cleaning the ground around a shrub takes five minutes. Trying to get ahead of leaf spot or mildew once it gets going next summer takes months of effort.
Quick tip: If you have mulch, you don’t need to remove the old top layer unless it’s full of diseased material as well.
4. Refresh the Mulch
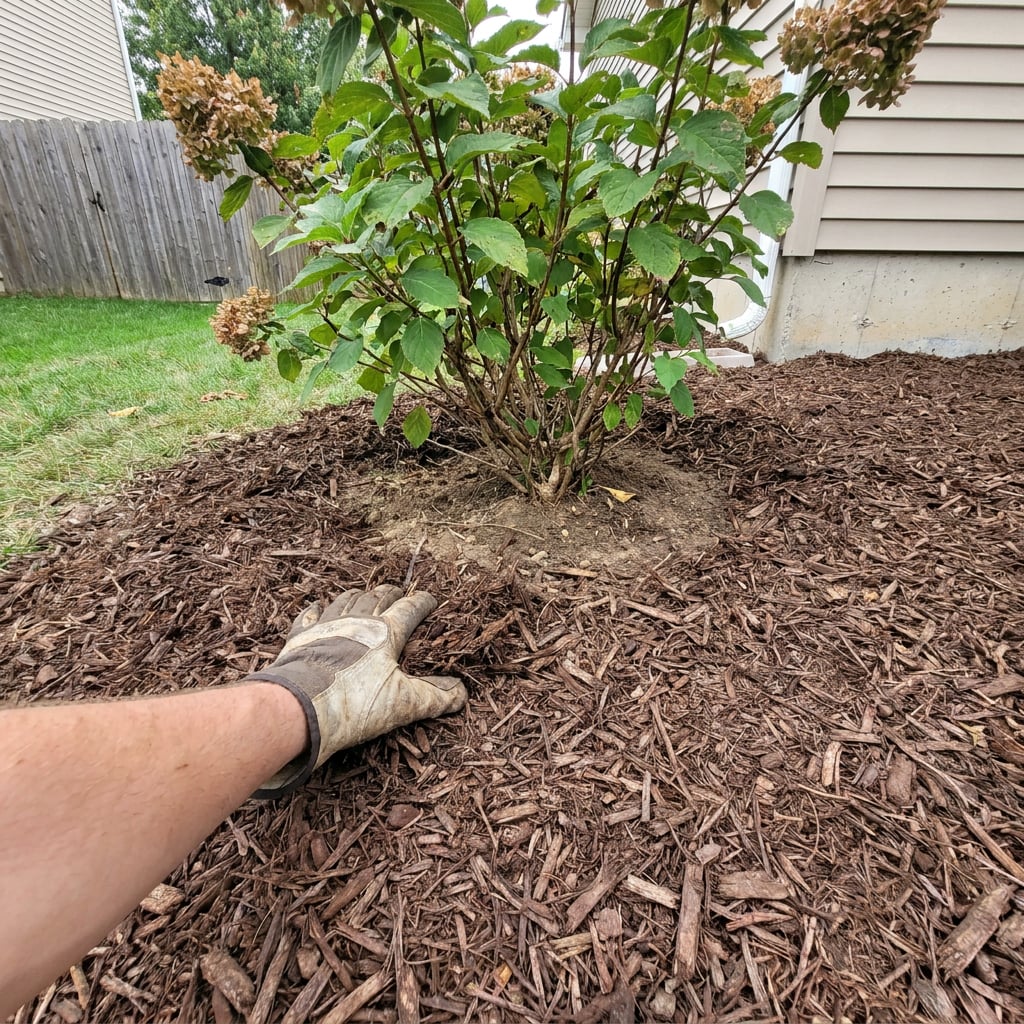
I know people who use mulch purely for aesthetics, but right now I think of it as a splash barrier.
Once any infected leaves and debris are gone, top up the mulch if it’s getting thin. A fresh layer helps stop soil and soil-borne pathogens from splashing onto the leaves during heavy rain.
Two inches thick, two inches away from the main stems. Skimp on depth and soil can splash right back onto new spring leaves during heavy rain.
That small ring of bare soil around the center matters too. Piling mulch against the stems holds moisture where you don’t want it and can encourage rot, so keep the mulch flat and the stems clear.
5. Plan Winter Protection
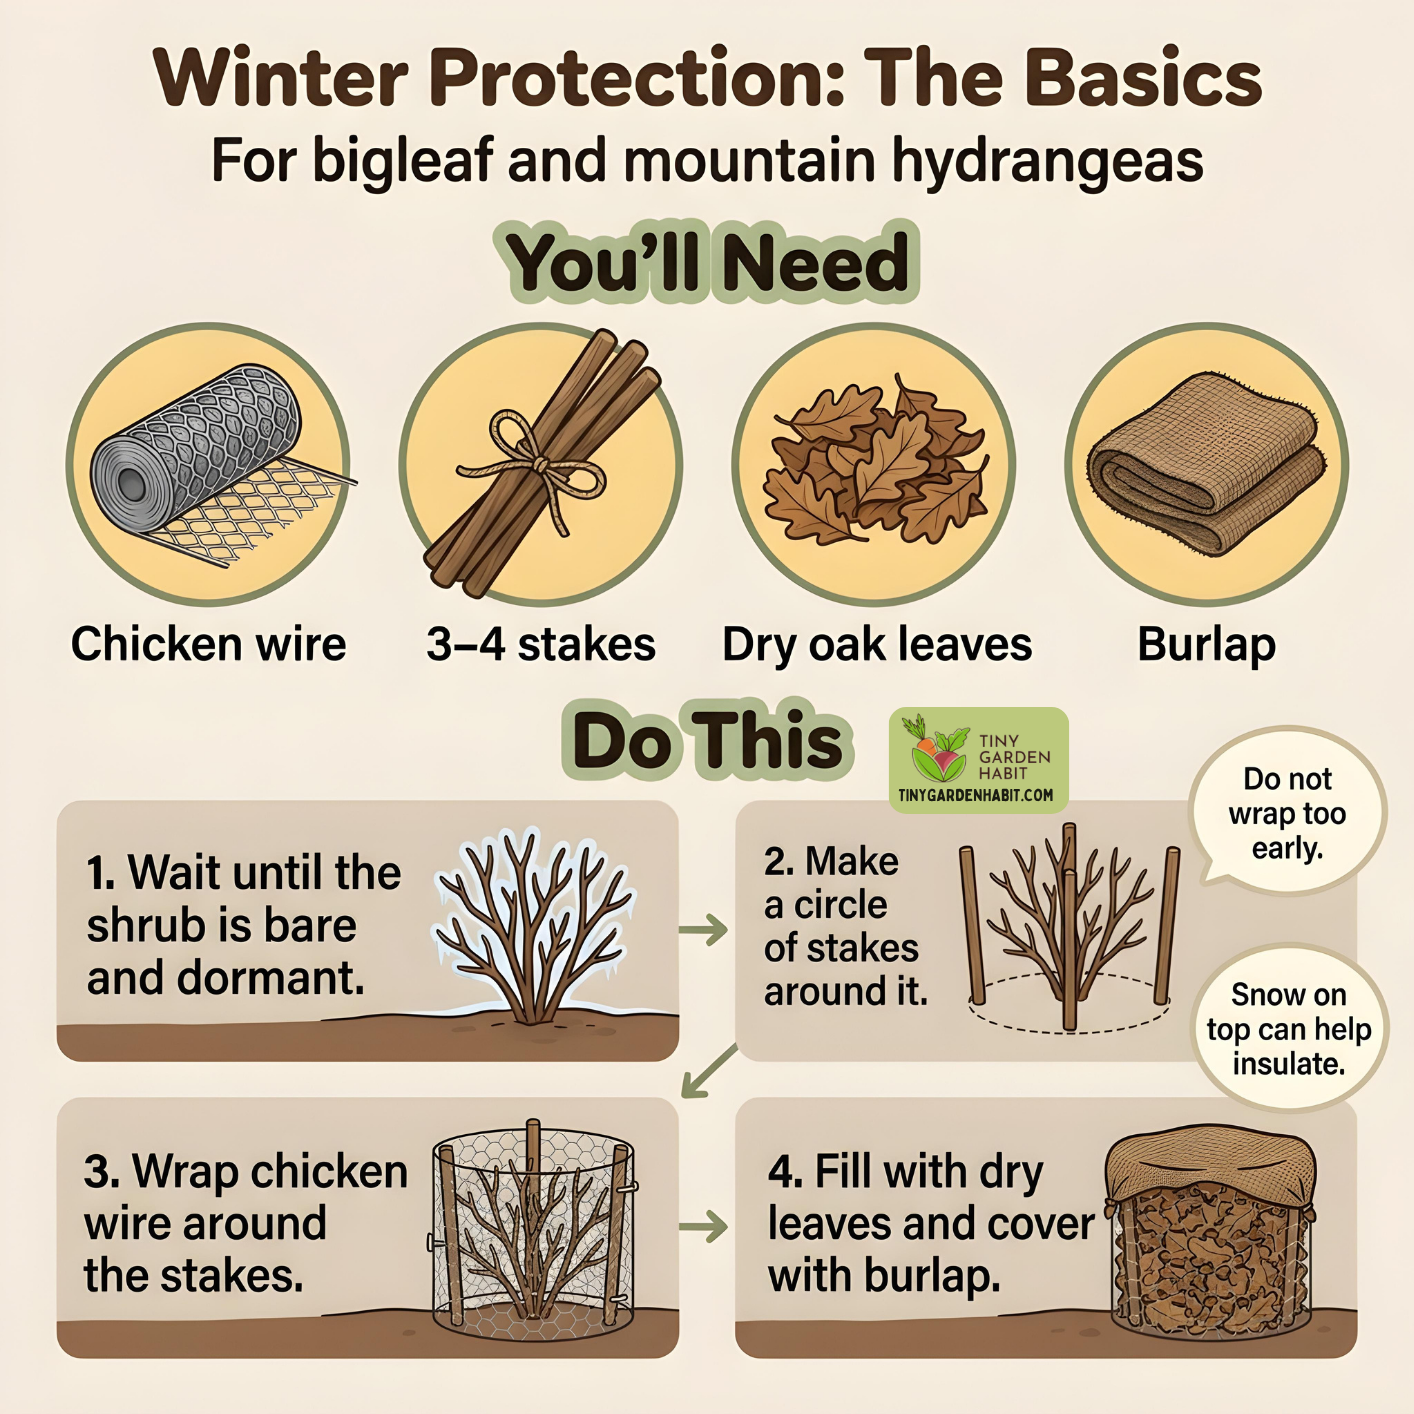
If you grow bigleaf or mountain hydrangeas in a cold climate where winter regularly damages the flower buds, this is the time to plan some protection.
Deep cold, temperature swings, and drying winter winds can kill those buds faster than my enthusiasm for early morning weeding.
Gather your supplies now and stash them somewhere cool and dry:
Do not wrap the plant just yet. Wait until the shrub is dormant and the leaves have dropped. It may look completely dead and bare, but that’s exactly what you want. Then:
The leaves create an insulating layer around the old wood and help protect next year’s flower buds through winter.
Bonus tip: You’re probably assuming rain and snow will soak the leaves and murder your plant anyway. The reason I like oak leaves is that they’re stiff and slow to mat down, so they keep little insulating air pockets around the stems even when they get damp.
Bare woody stems can handle some moisture. The bigger threats are extreme cold, temperature swings, and drying winter winds. And don’t panic about snow piling up on top. A good layer of snow can actually provide extra insulation.
Once winter actually arrives, we wrote another guide on 4 winter hydrangea jobs that help protect the shrub and next year’s flowers.
Two Great Ways to Sabotage Next Summer’s Flowers
If you’ve followed steps one through five, congrats: you’re almost in the clear. Now don’t ruin all your hard work by making these two ridiculously common fall mistakes.
Mistake 1: Pruning Old Wood in September
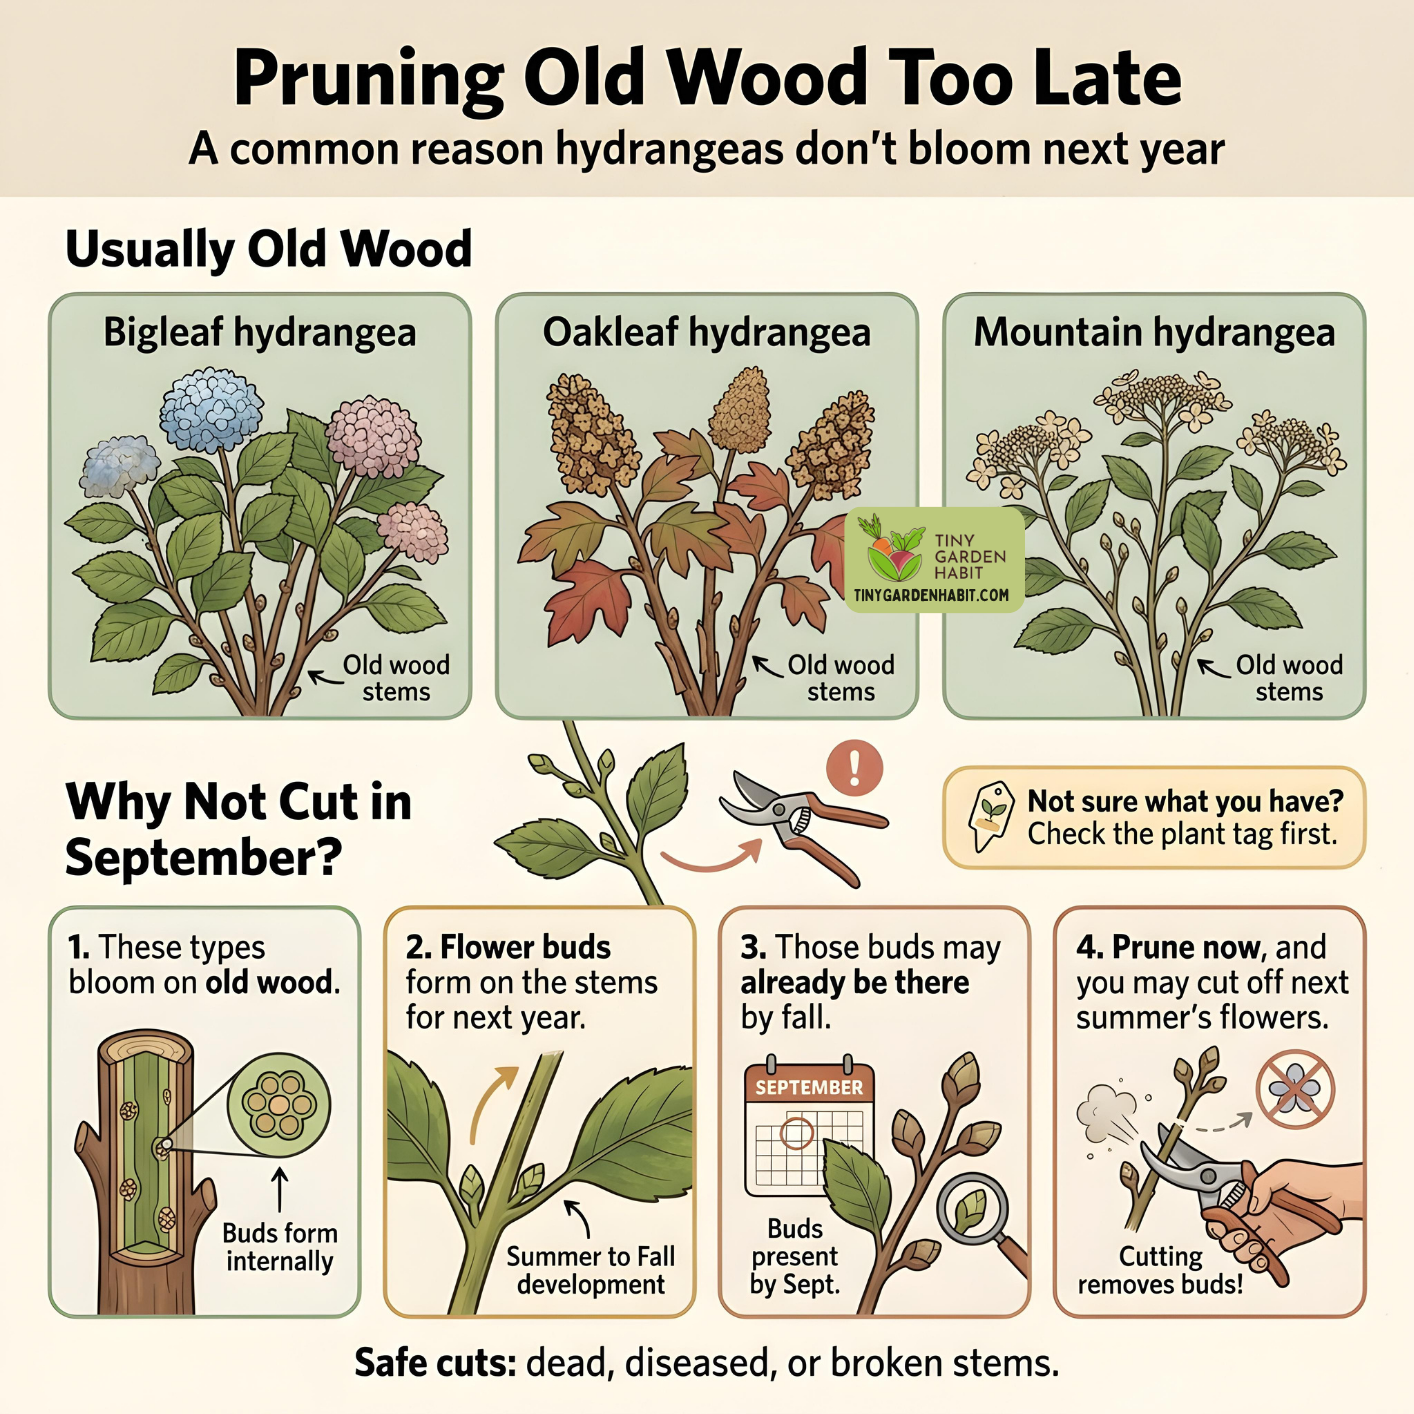
Pruning old-wood hydrangeas in fall can translate to cutting off next summer’s flowers and throwing them straight in the yard waste bin.
You are essentially paying good money to downgrade your garden and blame it on Halloween, though, again, it’s a great look if you’re trying to irritate your HOA.
Bypass the pruners unless a stem is blatantly dead, diseased, or broken.
Bad pruning is only one way to lose the show, so we wrote a guide on 7 mistakes that keep hydrangeas from blooming and how to fix them.
Mistake 2: Late-Season Feeding
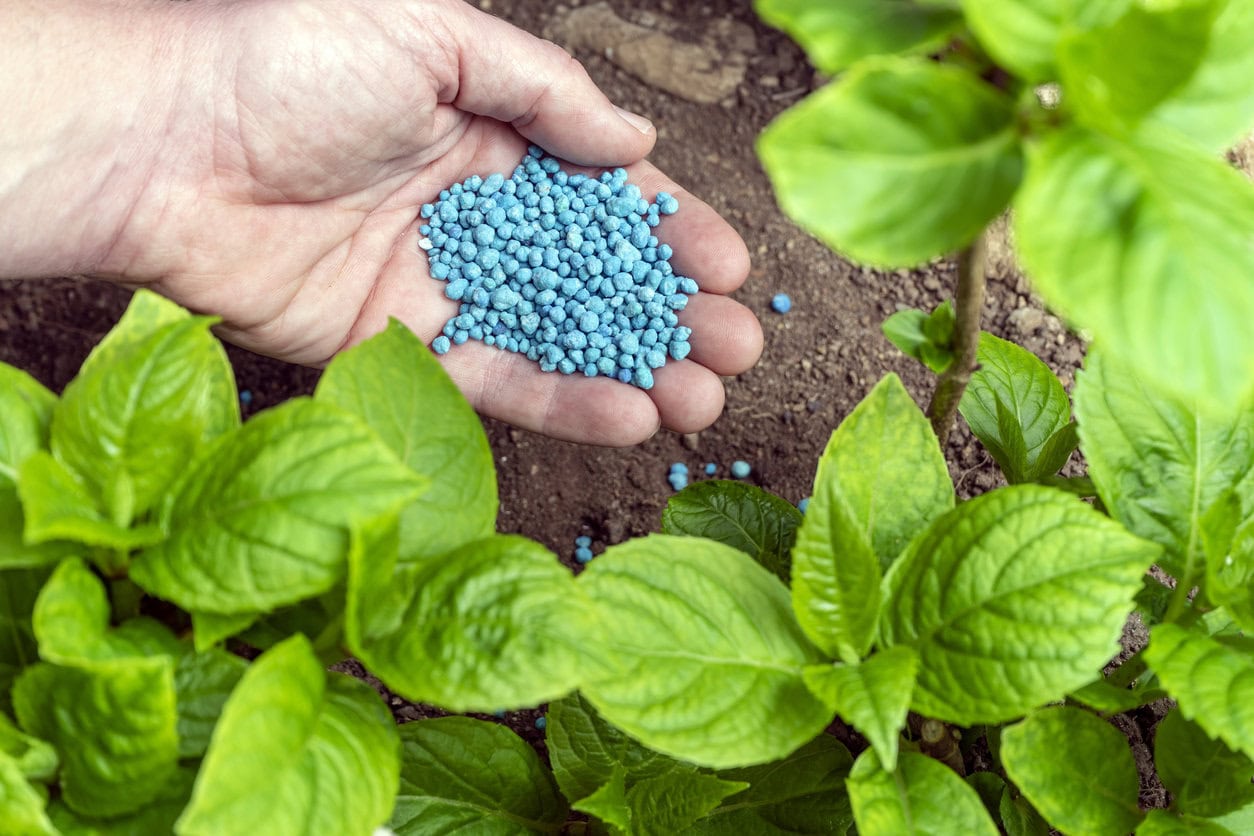
Plant food in September, especially anything high in nitrogen, can trigger a burst of juicy new growth right when the shrub is supposed to be hardening off for winter.
The first early frost can damage that tender green wood before it has time to toughen up. I put the plant food away by mid-summer and let the poor thing wind down naturally.
If you’re never quite sure when that fertilizer bag should come out or go away, we explain the whole schedule in our month-by-month hydrangea fertilizer guide.
Just Paint It Blue
It might seem that hydrangeas need constant attention, with requests for the right soil pH, diet, watering habits, and trimming at just the right time. My ex had fewer demands. And yet, it’s not the plants that ended up in the trash…




My hydrangea are dying, i dug one up and the others have black spots what can i do to save them
Hi Phyllis 🙂 I wouldn’t dig the others up just yet. Black spotting is often a leaf spot disease and usually doesn’t kill an established hydrangea by itself. Remove badly affected and fallen leaves, avoid getting the foliage wet when watering, and check that the soil isn’t staying soggy.
I just Wa t to know WHEN to cut the spent blooms off? These are old established plants. I would just cut the bloom off to the first leaf set. It is now almost late August in the Pacific Northwest . I am so confused. Thank you
Hi Julia 🙂 You can still remove just the spent flower heads now, cutting right above the first healthy pair of leaves or buds. I just wouldn’t shorten the stems or do any real pruning now, since an old-wood hydrangea may already be forming next year’s flower buds.
My hydrangea looks like your picture of the Mountain Hydrangea so how and when would I prune it. Does it flower on old or new wood. It is still in flower.
Hi 🙂 Mountain hydrangeas generally bloom on old wood, although some newer reblooming varieties flower on both old and new growth. Since yours is still flowering, I’d skip any shaping now and only snip off spent blooms if you want to.
I have big leaf hydrangeas. Do I prune in the old wood now as they have buds .
Hi Matthew 🙂 If those are bigleaf hydrangeas and you can already see buds on the old wood, I would not prune them now. Those buds can become next year’s flowers, so only remove anything dead, diseased, or broken.
Can you please tell me then the best time to prune the big leaf hyrangea? I’ve attempted fall and spring with no consistency in blooms. Thank you.
Hi Cindy 🙂 For a bigleaf hydrangea, the best time to prune is right after it finishes blooming, and only if it really needs it. Fall and spring pruning often remove the flower buds, which is why bloom can be inconsistent. If yours has been unreliable, I’d actually stop pruning it for a season except for dead wood and see if the flowering improves.
I have a hydrangea called Runaway bride fall of leaves this summer it should have small flowers along there stems don’t know the proper name?
I have big leaf hydrangeas that flower in old wood. My plants are becoming huge and out of control where they currently are planted… up next to the house. How do I reasonably contain them or do I need to move them?
Hi Terri 🙂 You can keep a bigleaf hydrangea smaller, but it’s difficult to permanently hold a naturally large variety in a tight space without regular pruning. I’d remove up to about a third of the oldest stems at the base right after flowering each year. If it still constantly crowds the house, moving it to a roomier spot may ultimately be the easier option.
When would you move it?
Hi Lori 🙂 I’d wait until the hydrangea has gone dormant and dropped its leaves, but move it before the ground freezes. If you miss that window, early spring before new growth starts is the next best time.
I have the same issue. To make the hydrangeas smaller do you say dig up 1/3 of the oldest stems this fall? I live in Washington state
i have a beautiful Strawberry hydrenga. It is just covered with cone shaped flowers and they are starting to turn pink YEa. My question It is getting rather big perfect size.for this location Can it be trimmed and shaped back this fall It is 3 years old
Hi Davene 🙂 If yours is a Vanilla Strawberry, it blooms on new wood, so you have much more flexibility. I’d enjoy those pink flowers through fall and do the shaping in late winter or early spring before new growth starts, shortening the branches by about a third if needed.
Hi good afternoon my name is Norma I have big leaf hydrangea and I don’t prune them and they have buds on them and they don’t ever bloom
They bloom once when I put them in the ground from some one that gave them to me when they was little 8 years ago.
The leaves every year are all ways big beautiful and green never no flowers thank you very much for any advice.
Hi Norma 🙂 If your bigleaf hydrangeas are forming buds but those buds never make it to flowers, winter cold or a late freeze may be damaging them. Bigleaf hydrangeas carry many of their flower buds on old stems through winter, so I’d protect those stems in colder climates and avoid pruning them now. Too much shade or nitrogen can also reduce flowering, but cold damage would be high on my list if you’re seeing buds first.
I would like my big leaf hydrangea to be about half as tall as they are. Some stems are brown while others are green. When can I trim them way back? Do the brown stems have internal buds?
Hi Gina 🙂 Brown woody stems on a bigleaf hydrangea are not necessarily dead, so don’t remove them just because of their color. If you want the shrub about half as tall, I’d reduce it gradually by removing some of the oldest stems at the base right after flowering, rather than cutting everything halfway down. In September I’d leave healthy stems alone because next year’s buds may already be there.
My hydrangeas are rather large and there are many spent blooms. Should just the blooms be cut off or should the plant be trimmed to a better size?
Hi Renette 🙂 Until you know what type it is, I wouldn’t hard prune it. I’d only remove clearly dead or damaged stems.
OMG IM EXHAUSTED! I love hydrangeas and you can understand that because my entire house is surrounded by them. I have at least 20 🤦♀️. At age 75 I’m running out of steam caring for these beauties. Your picture of types is very helpful BUT I’m now dealing with black spot for 2nd year in row. Last year I tried removing all the diseased leaves (plants were nearly bare) then treated with fungicide. Well this year it’s back 😩. I treated once already, 14 days will do again. HELP Location is upstate New York
Hi Jean 🙂 For an old-wood hydrangea, the safest time to thin it is right after it finishes flowering, before it starts forming next year’s buds. I’d remove a few of the oldest stems right at the base rather than shortening everything, usually no more than about a third of the plant at once. If it’s already late summer, I’d wait until after next year’s bloom unless you’re removing dead or damaged wood.
I have a Incredibal hydrangea and it’s beautiful and huge blooms.
The blooms start out white and now in the fall the booms turn green.
If I use aluminium sulfate will the blooms turn blue?
Hi Donna 🙂 No, aluminum sulfate won’t turn an Incrediball hydrangea blue. Incrediball is a smooth hydrangea, and its flowers naturally open white and often age to green later in the season. The blue-and-pink color change from soil chemistry applies mainly to certain bigleaf and mountain hydrangeas, so I’d just enjoy that pretty green stage as part of its normal cycle.
Hi! I have two of the big leaf plants. I’ve had them for probably 15 years. They were gorgeous and I never touched them. About 6 years ago, I completely cut them off (having no idea what I was doing). They didn’t bloom for 2 years, then they each got a flower or two, the next year nothing, last year a bunch of small pretty flowers (nothing like the huge beautiful ones from before), this year I got one flower on one and nothing on the other. But, I’m now seeing a bunch of flowers just starting to form this late on the one with the flower. Here’s the thing – I built a new house and I’m moving. I would love to take these with me. Can they be dug up and replanted? Is it worth it since I messed them up? Can the plants be divided? Sorry for the long post! Thanks!
Hi Heather 🙂 Yes, I would absolutely take them with you! Cutting them back years ago didn’t permanently ruin them, especially since they’re healthy and trying to flower again now. I’d move them once they’re dormant after the leaves drop, taking as large a root ball as you reasonably can, or wait until early spring before new growth starts. Don’t divide them like a perennial though. I’d move each shrub whole, and if you want extras, take cuttings or layer a branch instead!
I have a hydrangea which is 6-7 years old and has had one bloom during that time. I’ve never seen one like this. It has thick, tough leaves about the size of my big leaf bushes. It was given to me with no tag so I have no idea what variety it is. It doesn’t seem to grow as
fast as my big leaf bushes. Can you identify this bush site unseen by my description?
Hi Joan 🙂 I wouldn’t want to guess the variety from that description alone. Hydrangeas can look surprisingly similar without seeing the leaves, stems, and flowers. If you can send a photo of the whole plant and a close-up of the leaves to our e-mail, I can help narrow it down. The fact that it has only bloomed once in 6-7 years could also give us some clues once we know what type it is.
Hi,
My two 40-year old big leaf hydrangea were attacked by soft shell cottony cushion scales. In addition to that, some of the branches grew way to high.
How to prune and where to cut? Should I removed everything that’s infested?
Hi Eva 🙂 I wouldn’t remove every branch just because it has scale, especially on a 40-year-old bigleaf hydrangea. I’d remove dead wood and any stems that are very heavily infested, but treat the rest of the plant for the scale rather than cutting everything away. For the branches that are simply too tall, wait until right after flowering to shorten or thin them so you don’t remove next year’s buds. Cottony scale can take more than one season to get under control, and treatments work best when timed to the vulnerable crawler stage or with dormant oil at the appropriate time.
Good morning I am new to the hydrangea cutting improving and I have three that are panicles. One is two years old and I got one flower off of it this year and the other two I picked up at a garden center that were reduced and looking like crap, but now they are healthy and blooming and green however, when do I trim them back or do I wait till spring?
Hi Roxie 🙂 Since yours are panicle hydrangeas, I’d leave them alone now and wait until late winter or early spring before new growth starts. They bloom on new wood, so that’s the best time to shape them. Since the two rescued plants are healthy and blooming now, I’d enjoy them and only give them a light shaping next spring rather than cutting them back hard.
There’s a lot of information on when NOT to trim Big Leaf Hydrangeas but when DO you trim them if they’re getting too big?
Hi Cyn 🙂 Bigleaf hydrangeas are best trimmed right after they finish flowering, before they start setting next year’s buds. If yours are getting too large, you can remove some of the oldest stems all the way at the base and reduce the size gradually rather than cutting the whole bush in half. Once you get into late summer or fall, you should leave healthy stems alone until next year.
I have a big leaf and it has finally decided to bloom (a lot) now that it is September. It needs to be trimmed back, when can I do this? Also, how do I get it to bloom over summer?
Hi Michael 🙂 Since your bigleaf is flowering now I’d enjoy those blooms and not trim it back afterward this year! It may already be carrying next year’s buds on other parts of the plant. If it needs reducing, I’d do that after its main bloom next year. To encourage earlier flowers, protect those old stems through winter if you’re in a cold climate and avoid spring pruning. If yours is a reblooming variety it can also flower later on new growth, but traditional bigleaf types naturally rely much more on those overwintered buds
Hi I’m Gloria Justice
I have two big leaf plants and they are gigantic. I had no blooms this year. Two or three top leaves have a bit of fungus. The weather is extremely hot. I have no idea what to do with them. I see no buds.
Hi Gloria 🙂 I wouldn’t prune those bigleaf hydrangeas now, even if you can’t see obvious buds. They may already be forming next year’s flowers on those stems. With the extreme heat, focus on deep watering at soil level and keeping the roots evenly moist. Remove the few fungal leaves and any that fall underneath, but you don’t need to cut the whole plant back because of a few affected leaves.
I have a big leaf hydrangea(endless summer) that is 15 years old and has only flowered 2x . The bush is 4 1/2 ft tall, strong and gorgeous but not a flower on the bush. I am ready to dig it out and replace with a panicle hydrangea unless there is hope for it. Please help!
Hi Susan 🙂 I wouldn’t give up on it just yet! Endless Summer is a reblooming bigleaf that can flower on both old and new wood, so after 15 years with almost no flowers I’d look at the growing conditions before replacing it. Too much shade, too much nitrogen, or winter and spring cold damage can all interfere with flowering. Since yours is growing so strongly, I would avoid pruning it now and make sure it gets good light and isn’t being heavily fertilized.
We have several large big-leaf hydrangeas along our backyard fence. They are beautiful, but need to be trimmed down. The thing that doesn’t make sense to me is that we’re supposed to trim then down right after flowering, but why would I want to do that when they are looking their best? Are you basically saying that I should cut these down in June and not enjoy them for the summer? Sorry, but I’m really confused on the exact time I should shorten my hydrangeas. September is still warm in the PNW, and it just seems natural to trim them later when they start not looking so good, as long as I’m pruning them above new buds. Wrong thinking on my part?
Hi Scott 🙂 I completely understand the confusion. “Right after flowering” doesn’t mean cutting off your hydrangeas while they’re looking beautiful. Enjoy the flowers! It means that if you need to reduce the size, the safest window is shortly after the main bloom has finished, before the plant starts setting next year’s flower buds. By September, I would leave a bigleaf hydrangea alone because those buds may already be forming, even if you can’t clearly see them. If they’re too large, I’d thin and shorten them gradually after next year’s main bloom rather than cutting the whole shrub down at once.
Hello . I have 6 big old world hydrangea plants that like my house . For years I would prune them halfway and u would get no blooms . Now I leave them and they start to bloom again but they are big plants and would like even more blooms . Do I prune them , cover them ? I live in northeast Ohio !
Hi Maria 🙂 It makes sense that they started blooming again once you stopped cutting them halfway. For old world bigleaf hydrangeas in northeast Ohio, I would avoid hard pruning and only do light thinning after flowering if they truly need size control. And yes, winter protection can really help there, especially if cold and wind are zapping the buds, so covering them after dormancy may give you better blooms next year.
My hydrangeas become huge, but have not flowered in the last two years. Not sure when to prune them and should I cut them all the way to the bottom. My landscaper usually cuts them back in the spring while they are just sticks. Is that correct?
Hi Jill 🙂 If these are bigleaf hydrangeas, cutting them all the way down in spring is very likely the reason you’re not getting flowers. I would not cut them to the bottom. The safest time to reduce size is right after they finish blooming, and even then I’d thin gradually by removing some of the oldest stems at the base instead of shearing everything hard.
First year of trying the fairy trail hydrangea. Only got about 3-4 blooms. I live in MI. What can I do over winter and next spring to get more blooms
Hi Lynn 🙂 Since it’s only the first year, I wouldn’t panic over 3 or 4 blooms. For winter in Michigan, the big thing is protecting the flower buds, so don’t prune it now, keep watering if fall is dry, mulch the roots, and once it goes dormant you can cage it with leaves and burlap for extra winter protection. Next spring, let it leaf out before deciding anything and avoid cutting the stems back.
Hello, I have blue lace hydrAgenda and they loom in spring but die out in summer they are planted on the south side should I prune the large bush now? Also on the north side I have a large cone flower looking bush that droop like. Waterfall should the stems be pruned now? Please advise thank you, Mary
Hi Mary 🙂 If by blue lace hydrangea you mean a lacecap/bigleaf type, I would not prune the large bush now. Most bloom on old wood and may already be carrying next year’s buds. The flowers naturally fade as summer goes on, and a hot south-facing spot can make them fade faster. For the cone-shaped hydrangea on the north side, if it’s a panicle hydrangea, it blooms on new wood, but I’d still wait until late winter or early spring to shorten those drooping stems. If you’re not sure what that second shrub is, identify it before cutting anything.
I have big leaf, every spring plant looks great, it blooms then around July, what looks like brown spot, the plant loses most if not all of its leaves. I have tried fungicide with out much success. I give up. Central Virginia
Hi Arch 🙂 Don’t give up just yet. What you’re describing sounds a lot like Cercospora leaf spot, which often shows up on hydrangeas during warm, humid summer weather. Fungicide won’t repair leaves that are already infected, so timing matters. This fall, rake up and trash all the spotted and fallen leaves, keep a fresh layer of mulch down, and next year water at soil level rather than wetting the foliage. If it happens every July, you may need to start any fungicide treatment preventively, before the spots really get going.
Hello there! 1. How to make the flower a vivid blue or dark pink, or even change the color of the bloom? For big leafe hydrangea in New England. 2. For protection, does it have to be oak leaves? Thank you so much!
Hi 🙂 For a bigleaf hydrangea, flower color is largely influenced by soil pH and available aluminum.
– For bluer flowers, aim for more acidic soil around pH 5.2–5.5.
– For pinker flowers, raise it closer to about 6.0–6.5 with garden lime.
I’d test your soil before adding anything, and keep in mind the exact shade also depends on the variety. For winter protection, no, it doesn’t have to be oak leaves. I like oak leaves because they stay fluffy and don’t mat down easily, but other dry leaves can work too as long as they don’t pack tightly around the stems.
Can You cut the flowers to dry an let the rest in lg flower pot in a basement till spring,will it come back?
Hi 🙂 Yes, you can cut the flowers for drying. If the hydrangea is staying in a large pot, you can also overwinter it in a cool, unheated basement once it goes dormant, and it should come back in spring. Keep the soil just slightly moist through winter (not wet!) and don’t cut the stems back unless you know which type of hydrangea you have, since some carry next year’s flower buds on those stems.
Hello. I have the pine cone shaped hydrangeas. Can I cut the flowers and stems about 12″ when they are in full bloom, just turning pink? I dry them and make wreaths out of them. The plant is about 4-5 feet tall. Will it hurt the flowers next year? Thank you!
Hi Jeanie 🙂 If yours has those cone-shaped blooms, it sounds like a panicle hydrangea. Yes, you can cut those flowers with about 12 inches of stem for your wreaths, and it won’t hurt next year’s blooms because panicle hydrangeas flower on new growth. I actually like cutting them once they’ve started turning pink and the flowers feel a little papery because they dry beautifully that way.
Hello, my big leaf hydrangeas are getting to big, when is the best time to prune them, I must cut them to half there size because they are interfering with my walkway.
Hi Albert 🙂 Since yours are bigleaf hydrangeas, I wouldn’t cut them in half now. They usually set next year’s flower buds on old wood, so a hard fall prune can mean far fewer blooms next year. The best time to reduce their size is right after they finish flowering. If they’re blocking the walkway now, you can selectively shorten only the stems that are in the way, just knowing you may sacrifice some blooms on those stems next year