

For many people, propagating a Christmas cactus is one of the most difficult and complex things they can do. For seasoned gardeners like me, it’s just another Monday afternoon task.
So, what’s the secret to taking a challenging task like propagation so calmly? Simple: I’ve propagated my Christmas cactus countless times over the years. With experience comes confidence.
Today, I’ll be teaching you how you can propagate your Christmas cactus the easy way, so next time you’ll approach it with the same calm confidence too. Let’s dive right into it!
How to Propagate a Christmas Cactus: A Step-by-Step Guide

Step 1: Choose a Healthy Parent Plant and Timing

The first step towards a successful propagation job starts with choosing the right parent plant. The right parent plant is:
When you take cuttings from a healthy parent plant, the chances of growing a defective Christmas cactus are greatly reduced. It ensures your plant’s health and safety in the initial stages of growth.
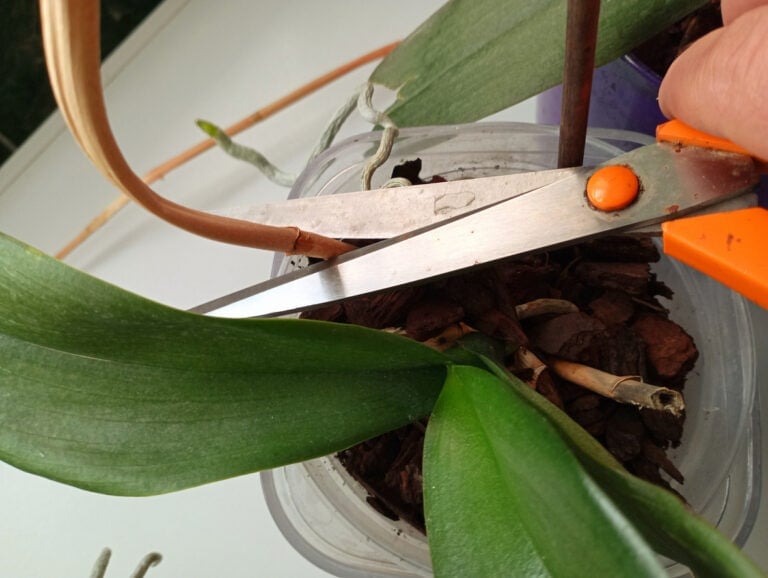
Step 2: Take Stem Cuttings

Because of how delicate and easy-to-break Christmas cacti are, you won’t really need pruning shears or scissors for this. Gently twist off a stem that has 3-4 healthy-looking leaves on it and use it for propagation.
Remember to be gentle and not damage the rest of the plant by pulling too hard and possibly risking root injury.
Step 3: Prepare the Pot and Soil

When it comes to the pot, use whatever pot you have available at home, even if it’s on the slightly smaller side. We’ll be transplanting the Christmas cactus in the end anyways.
For soil, play with a mix of generic potting mix, perlite, and some sand. This blend should create the ideal growing environment that supports healthy root development and limits potential waterlogging problems.
In the images I’m showing, you’ll see a Thanksgiving cactus being used for demonstration purposes, but don’t worry, the propagation process is exactly the same for your Christmas cactus. Just follow the same steps!
Step 4: Plant the Cuttings

Once your pot and soil are ready, plant your cuttings carefully. Personally, I’d suggest letting your cuttings dry out completely before you plant them, as it limits the chances of fungal disease.
Plant your cuttings cut side down, and avoid burying them in the soil all the way. Just halfway deep should be good enough. The cuttings should remain upright and not tip over, or else, growth may be a little deformed.
Step 5: Water and Care

Now comes the most important part, caring for your cuttings. The fact of the matter is that growing cuttings require a lot more love and attention compared to fully matured Christmas cacti. They’re young, delicate, and do not handle neglect very well.
It’s important that you timely fulfill their needs and remain consistent where you can.
Step 6: Watch for Root Development

When you plant a cutting, it’s mainly root development that you’re after. Look for signs of root growth in the initial stages of planting. The roots may be paler, thinner, and much smaller in the beginning.
Over the course of the next few weeks, your roots are likely to become thicker and spread much more quickly. Ensure consistently mild temperatures for unhindered root development.
Step 7: Transplanting

This is the step in the process that requires you to be the most cautious.
For transplantation, you first need to successfully pull out your Christmas cactus from the pot with its roots intact.
This is best done using your hands rather than some sharp gardening tool. It’s crucial to be gentle here as any harsh tugs or pulls can damage the root system right away.
You can either transplant your Christmas cactus into your garden outdoors or into a larger pot with more free space to accommodate full root spreading. Either way, ensure that wherever you’re planting, the soil is well-draining and your plant receives plenty of indirect light.

Conclusion
So, there you go, 7 steps that can help you propagate a new Christmas cactus from an old one. I’ve experimented with propagation many times in my gardening journey, and it has helped multiply most of my plants threefold!
Give it a shot and, if you’ve got any special propagation tips or tricks, don’t forget to drop them below!


I just lay cutting in the dirt, they take root really easy. Mine bloom anywhere from 3-5 times a year too!
Wish I could post the picture, my main one is over 100 years old and I have 3 colors, pink, red and white
Hi Lora!
That’s incredible! A 100-year-old Christmas cactus with all those colors must be stunning! Thanks for sharing your tip—simple and so effective. Happy blooming!
These cacti DO NOT HAVE LEAVES ! !
They are stem sections known as cladophylls or cladodes
Hi Bill 🙂 I know they’re technically stem segments called cladodes. I only used “leaves” once, so you caught me haha. I try to keep the wording simple for everyday plant owners, but you’re right on the technical term.
Where do you live?
Please post pictures of your cactus, you just lay your cactus on the dirt and it will root ?
That’s wonderful, I love my Christmas cactus
I put a thin layer of just perlite in a container lay the cutting on top and mist with water every day or so and they grow great roots fast. I have even took the parts that have fallen off and started to shrivel and turn purple that I find when cleaning behind my plant sometimes and put in there it takes a little longer but i have brought them back to life from near dead this way.
Hi Holly! 😊 That’s such a smart method, perlite rooting works so well for Christmas cactus cuttings. I love how you’ve even saved the shriveled pieces… they’re tougher than people think!
Great article! FYI a famous organic soil & fertilizer us in litigation (Calif) allegedly containing toxic metals & microparticles. No ‘miracle here’.. I use 1/3 coconut coir brick & ground, perlite and weak amt fertilizer. No bugs or mold.
Hi Lynnsey! 😊 I’ve never used coconut coir in my mix, but that sounds like it’s working really well for you! Might have to give it a try. Thanks for sharing!
Mine is budding for the first time! How often should I water them? They are inside on a shelf unit in front of a French door. Only indirect lighting is on them
Hi Judy! 😊 Congrats on the buds, that’s so exciting! When they’re budding indoors, I water just enough to keep the soil lightly moist. Usually every 7 to 10 days works, but always check the top inch of soil. If it feels dry, it’s time to water. Keep the light indirect just like you’re doing and those buds should open beautifully!
While your plant is budding, do not move it at all, if you do, it can cause the buds to fall off and not bloom, good luck…also once ever 3-4 months I do put a little bit of spent coffee grounds in to my soil, these cacti love it, and helps them bud so much better!
Hi! 😊 Great tip about not moving it during budding, that’s so important! And yeah, coffee grounds work great for these plants (if used properly, once every 3 to 4 months is absolutely fine). My mom does the same thing a few times a year, they love the slight acidity boost. Thanks for sharing!
I bought my Thanksgiving cactus and it was full of blooms and buds. Why did the buds fall off? I had to bring it home from the store…
Hi Pearl 😊 Bud drop is usually from stress right after bringing it home. Temperature swings, a cold car ride, dry air from heat vents, or moving it to a new light spot can all trigger it. I’ve had the best luck setting it in one bright spot, away from drafts, and watering lightly only when the top feels dry.
Is it equal parts of potting soil, perlite and sand?
Or is that more of one than the other? I want to buy a Christmas cactus and start any cuttings from it. I’ve never done it before, but they seem just so beautiful.
Do they like to be in a small pot or a larger pot for growth?
Hi Claudia! 😊 For the soil, I usually add about a small handful of perlite and sand to a pot of regular mix, just enough to lighten it without making it gritty. They like it light and airy, not heavy. And yes, they prefer small pots! They actually bloom better when they’re a little root-bound.
When is the best time to propagate a Christmas cactus and can you put multiple colors in the same pot.
Hi Sharon! 😊 The best time to propagate is right after it finishes blooming, usually late winter or early spring. And yes, you can absolutely plant multiple colors in the same pot. They grow beautifully together and make an amazing mixed-color display!
I have two plants that I inherited from my mom 10 years ago. They bloom maybe twice a year. My question is how do I tell if they are Christians or Thanksgiving cactus?
Hi Jerry! 😊 A cute trick is to flip a segment upside down, on a Christmas cactus, it looks like a little Christmas tree because the edges are smooth and rounded! On a Thanksgiving cactus, the edges are sharp and claw-like instead.
Thank you with that I now know I have one of each. Next I’ll be trying some of the propagation tips🤞
Hi! 😊 That’s awesome, Jerry! One of each is perfect. Propagating them is super easy, you’ll have plenty more plants from your mom’s originals in no time. Good luck with it!
My wonderful neighbor used to set them outside under her covered porch.
(We live in western Wa.) She was moving back to Japan after her husband passed and she was giving me one of hers. With everything going on it got ignored and died. I wish I knew then that it could have possibly been revived. Do they do well spending some time outside?
Hi Vicki! 😊 I’m so sorry about your plant, that’s such a sad way to lose one. Christmas Cactus can handle being outside in warmer months, but they’re pretty sensitive to neglect and temperature extremes. If you try again, they do appreciate some outdoor time in summer (bright shade is perfect), but they need regular care and should come inside before it gets cold. Don’t give up!
Thank you!
Hi Cathy! 😊 You’re so welcome. Happy growing!
How many rooted cuttings go into a pot please ive seen 1 to 5 so I’m not sure how many to plant on
Hi Nikki! 😊 Great question! I usually put 3-5 rooted cuttings in one pot, it creates a nice full plant faster. You can go with fewer if you’re patient, or more if you want that lush look right away. They don’t mind being a bit crowded!
I have an older one. But right now it’s in a jar with a little onion peel and garlic water. It’s got 3 leaves, One of them is small. There are two roots close to water and some smaller ones on top. I don’t know how to fix it or even if I can fix it.
Hi Sheri 🙂 I’d skip the onion peel and garlic water and move it into a small pot with fresh, well-draining mix. If it has roots, it has a chance, but keeping it in water too long can make rot more likely.
Thank you for all the tips. I’ve always been curious.
I have one that a co-worker got from a customer in a yogurt cup over 5 years ago and I finally transplanted it last year into a not much larger pot but it is thriving
And the final thing is, thank you for helping me know the difference between a Thanksgiving cactus and a Christmas cactus I always thought they were the same plant 😧
Hi Vivian! 😊 Love that your yogurt cup cutting is thriving after 5 years, that’s awesome! And yeah, they really do look similar, don’t they? The leaf shape is the giveaway. So glad the article helped clear that up for you!
hi I’ve just got my first 2 flowering cactus & one is started to drop buds & i dont know what
to do for the best
Hi Roger! 😊 Oh no, bud drop is so frustrating! The most common culprit is usually a sudden change, moving the plant, temperature shifts, or watering changes. Once they start blooming, Christmas Cactus really like consistency. I’d keep it in the same spot, keep the watering steady, and resist the urge to fuss with it. The good news is the buds that stay should open beautifully!
So we have tried to start several cactuses from a plant that was my great grandmothers and there are like five starts that have been growing for a couple years and are growing well but none have ever bloomed. Is there something we’re doing wrong. It’s not in direct sunlight and it is in cool environments and warm environments between our different houses. How do we make them bloom.
Hi Terry! 😊 Sounds like you’re doing everything right with the light and environment! The missing piece is probably the dark period trigger. Christmas Cactus need 12 to 14 hours of total darkness each night for about 6 weeks in fall to set buds. Even if they’re not in direct sunlight during the day, they still need those long dark nights. Next year, try putting them somewhere completely dark at night starting in September, that should do the trick!
So, do you leave them in the dark from September to December or take them in and out each day for 12-14 hours of darkness?
Hi Michelle 🙂 You don’t have to move them in and out every day if you have a spot that stays naturally dark at night. The key is about 12 to 14 hours of uninterrupted darkness for several weeks, with normal bright indirect light during the day.
I propagated a couple Christmas cactus. Seemed to do well–except neither have ever bloomed. Kept the healthiest that’s about 4yrs old now. Last ditch effort has been keeping in a darker, cooler room the last 6 weeks. About to bring it out…do they sometimes never bloom?
Hi Sharon! 😊 Some Christmas Cactus can be stubborn, haha! After 4 years, they should definitely be mature enough to bloom. The key is giving them that dark period in fall: 12-14 hours of complete darkness each night for about 6 weeks starting in September/October. Even a little bit of light at night can prevent budding. Try putting them in a closet or room you don’t use at night. Once they set buds, bring them back out!
When in the growing and blooming cycle do you suggest propagation? Once the blooming process ends?
Hi Sandra! 😊 Best time to propagate Christmas cactus is right after it finishes blooming in late winter or early spring. That gives the cuttings plenty of time to root and establish before the next blooming cycle. You can technically propagate anytime, but spring works best in my experience!
I have grown and propagated Christmas Cactus for many years. I believe timing is important. I never propagate when the plant is blooming. I like to give the plant a chance to rest and recover after blooming. I wait until late January or February.
After so many years, the plants can get very large and heavy to move. I like to put them in the shower or out on the deck and gently water them well. After the plants get too big, it is time to take cuttings and make new plants.
I try to select larger cuttings, those with a base and several branches. I put the cuttings in a jar of water and then plant them after roots have developed. When planting the cuttings with roots, I think about people I know who are going through a difficult time. When watering that plant, pray for that person. When the cactus starts to bloom, I give that plant to them.
Hi Donna! 😊 That’s such a beautiful approach. I love that you give the propagated plants to people going through tough times when they bloom. What a thoughtful way to share plants and lift someone’s spirits! Your timing advice is spot on too, waiting until late winter/early spring gives the mother plant time to recover. Thanks for sharing your method!
I put mine in water too. It works well for me. Like others have said, sometimes I find branches that have fallen off or broken off. I stick them in water til they root and them plant them. I have a family plant that was given to me by a great grandmother. I have made several plants from it for my granddaughters. They love it.
Hi Bobbi 😊 Water rooting can work, totally. I just mention soil first because it’s usually less fussy for beginners long term. If you do water, I’d let the broken end dry a day or two, keep only the very bottom in water, and pot it up once you’ve got a good little root bundle 🙂
Can Christmas cactus be propagated in water instead of soil and can a large branch (wooden base) be saved by placing in water to root.
Hi Simone 😊 Yes, it can be propagated in water, but I’d only root the soft green sections. A thick woody base usually doesn’t root well in water and can rot. If it’s a large piece, I’d take a few healthy tip cuttings instead and root those.
I usually put my cutting into a cup of water and wait for roots I will try with dirt after they are done blooming. I have one red 1-2 white and 4-5 pink. I bought a red last season. Also I heard about coffee recently so will give them some grounds later after they are done blooming.
Hi Cheryl 😊 If you’re rooting in water, that’s fine. I’d wait to add coffee grounds until it’s potted in soil and done blooming, and then go super light. These guys don’t like heavy feeding.
Would it help to dip the rooting end in root-tone?
Hi Mary 😊 You can, but you don’t really need it for these. If you use rooting hormone, just a light dip on the callused end is enough. Too much can actually slow things down 😅
Do you use your used coffee grounds or fresh unused grounds?
Hi Ronni 😊 Used, brewed coffee grounds are the safest. Fresh grounds can be too strong and can get moldy fast. I don’t use them but my mom sprinkles a tiny amount and mixes it in.
Curious about the directions to take a cutting with four sections, but the pics show just one section with roots. ??
Just bought one for the purpose of propagating, after reading about it.
I want to be sure I do it right. Thanks
Hi 😊 The easiest way to follow it is 3 to 4 segments connected as one cutting. Sometimes photos show a single segment as an example, but the success rate is better with a small chain. Let the cut end dry 24 to 48 hours first, then root it 🙂
I am always seeing articles for Christmas cactus, but hardly ever about Thanksgiving cactus. Do the same instructions apply to Thanksgiving cactus as Christmas cactus?
Hi Jeni 😊 Yes, the same instructions apply. The one I’m showing in the step by step it’s actually a Thanksgiving Cactus. 🙂
I placed my cuttings in a glass of water. They form roots real quick.
Hi Rose 😊 I’d just switch to soil once roots are a couple inches long so it doesn’t get shocked later when you pot it up.
Photos are of common Thanksgiving cactus. Those are not Christmas cactus.
I just put them in a glass of water… roots grow like crazy
Hi Linda 😊 Yep, roots can pop fast in water.
I have a lot of colors: white, gold, pale pink, dark pink, deep true red, light red. I think I’m going to try propagating!
Hi Karin 🙂 That sounds like such a beautiful mix of colors! Propagating is a great way to make more plants from your favorites, especially if you start with healthy 3 to 4 segment cuttings.
Does a thanksgiving cactus like to be potbound? I have one that is about 10 years old and water seems to be having a hard time penetrating the soil.
Hi Sara 🙂 They do like being a bit snug, but if water is struggling to soak in, the soil may be compacted or the roots may be too crowded. I’d gently repot it into fresh, well-draining mix, just one pot size up.
I have multiple Christmas and Thanksgiving cactus. What I find fun when they bloom is to pick off a bloom and pollinate another cactus bloom on another cactus. They usually set seeds and form a red seed pod that lasts for at least a year on the plant. So during the summer I have beautiful red ball shaped seed pods decorating my cactus.
Hi 🙂 That’s so fun! Those red seed pods can be beautiful, and it sounds like you’ve got a great little collection going.
Do you care for an Easter cactus the same way. I have some of each.
Hi Katie 🙂 Easter cactus care is similar, but not exactly the same. They still like bright indirect light and well-draining soil, but Easter cactus usually prefers a bit more consistent moisture than Christmas or Thanksgiving cactus.