

Planting garlic is an exciting time of the year. If you live in a place with harsh winters, like I do, it’s best to plant it in early spring, so it will be one of the very first crops you put in the ground. Growing garlic is easy, but if you’re a beginner, it might not seem as straightforward at first.
This article is meant to help you with prepping your garlic for planting – what kind of cloves to choose, papery skin on or off, soak or no soak, when and how to place it in the ground, and more. So let’s dig in!
Do you need to peel garlic before planting?
Garlic is an interesting plant – in its wild form, it’s able to spread through both bulbils and seed. Domestic varieties, however, have been bred to grow exclusively from cloves. One single clove of garlic is enough to produce an entire bulb over the course of a season.
When choosing to grow garlic for the first time, you can get your cloves from a reputable seed provider or a farmer’s market – just make sure they’re organic. Garlic bulbs from the supermarket are usually treated with a substance that prevents immediate sprouting, so it’s best to stay away.
Once you get your hands on your seed garlic (just a fancy name for regular garlic that’s meant for planting), you’re ready to go – but you need to know the basics first:
- Don’t plant the whole bulb! Garlic is supposed to be separated into cloves, and each clove individually placed in the ground.
- Don’t peel the garlic cloves! While separating the cloves, you want to keep their skins as intact as possible and only break through the outer layer of the bulb.
We’ll talk more about how to select the best garlic cloves in a minute, but here’s why you want to be careful not to peel the garlic, even accidentally. Think of the cloves’ outer skins as seed hulls – they’re there for protection from a variety of pests and diseases that garlic can suffer from. It also protects the garlic clove from rotting in the ground, as well as encourages friendly bacteria to colonize it.
How to process garlic cloves for planting
Garlic comes in many varieties, but the main categories to choose from are hardneck and softneck garlic. If you’re curious to know the difference, I’ve written an extensive article on the topic here.
Choosing between hardneck and softneck garlic is entirely up to you – I find hardneck grows bigger and stores better but has a more pungent taste, while softneck garlic is smaller and more delicate, but more flavorful.
Processing hardneck and softneck garlic cloves is also a little different.
- Hardneck garlic cloves have a tougher skin, but as the cloves dry up, it doesn’t stick to their surface as well. If you’re not careful, you risk dettaching the outer skin off.
- Softneck garlic cloves have a more papery skin that’s apparently more delicate, but sticks far better to the clove.
Softneck garlic cloves are arranged in layers, from largest to smallest in the middle, while hardneck garlic cloves are more or less equal in size, evenly distributed around a woody stem.
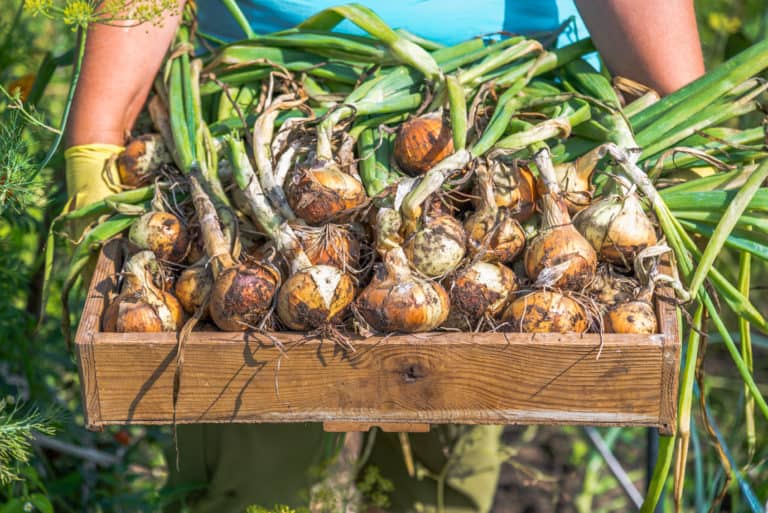
When separating garlic, you’ll end up with a multitude of cloves, and hopefully, most of them will be viable for planting. But if you want to ensure absolute success for your harvest, here’s how to choose the best cloves to plant:
- Always make sure you have an excess of garlic cloves, as you won’t be planting them all.
- Choose the biggest cloves, as they’ll grow into the biggest bulbs.
- Get rid of the cloves that have broken skins – they risk being bruised, and while they might sometimes grow fine, it’s better to be safe than sorry.
- Discard the cloves that seem dried up or brown. Healthy garlic flesh should look white.
It’s best to separate the garlic cloves at a different time than planting day. I like to do this the day or morning before, so I have enough time to select the ideal cloves and not contaminate them with dirt. If you plant a lot of garlic (I do a whole raised bed), it might take a little while. However, don’t allow more than 7 days to pass before you plant the separated cloves in the ground.
How and when to plant garlic
Here’s a quick guide for planting garlic:
| Timing | Zones with mild winters: plant garlic in fall, anywhere between October and December. Zones with harsh winters: plant garlic in early spring, as soon as the ground is workable. *for spring-planted garlic, keep it in the fridge for 4 weeks before planting to expose it to 40˚F (4°C), thus mimicking its ‘dormancy period’ |
| How To Plant | Plant garlic cloves root down and pointy side up in shallow drills or spaced holes. |
| Depth | About 2 inches deep – a little deeper if you’re overwintering it, more shallow if you’re planting garlic in spring. |
| Spacing | Plant garlic cloves 4 to 8 inches apart depending on the variety in rows spaced 6 inches apart. |
| Fertilizer | Garlic enjoys a nitrogen-rich fertilizer. Add blood meal and compost to the soil. Garlic also thrives in acidic soil – coffee grounds are a welcome addition when planting. |
| Mulch | Only use mulch when fall planting – and remove it in spring |
| Location & Water | Garlic prefers to be in full sun. Water thoroughly after planting, irrigate on dry days, and taper off watering a few weeks before harvest. |
Do you need to soak garlic before planting?
Some gardeners choose to soak their garlic cloves in different solutions before planting. This practice is mostly used in larger farms that grow organic garlic on a bigger scale, but as a hobby gardener, you don’t need to do this.
Soaking garlic cloves is done in two stages:
- First, the garlic is sterilized in a solution of either 80% rubbing alcohol, hydrogen peroxide or even vodka for 10 minutes. This ensures that any microorganisms that might naturally live in the garlic cloves (and lay eggs come spring) die off. Strain the garlic cloves.
- Soak them again in a fertilizer like fish emulsion, kelp meal or 1-1-1 fertilizer blend, mixed with 1 teaspoon of baking soda per gallon of water. Leave the cloves in this emulsion for at least 30 minutes, or overnight.
Fertilizing the garlic cloves ensures an added strength – a vaccination of sorts – against disease and environmental stress.
Now, you don’t need to go through these steps to grow garlic successfully. Some gardeners resort to these measures when their garlic hasn’t been growing properly – but if that happens, there are still other things you could do, like change the garlic variety or rotate your raised beds.
If you decide to soak your garlic, be careful not to soak for too long. Soaking garlic cloves for several days will lead to root growth, and those roots are fragile and should be handled carefully.
Can you plant sprouted garlic?
You may notice some of your garlic bulbs sprouting – this often happens in spring, if you’ve not been storing them properly.
Don’t panic, you can still plant sprouted garlic cloves – you just need to be really careful not to damage the sprout. When planting, it’s okay if the sprout protrudes out of the soil.
But if you have a choice, and your bulb hasn’t sprouted from all of its cloves, choose dry cloves instead. It’s best to allow garlic cloves to sprout on their own, in the ground. They’ll establish faster and it will be less of a transplant shock for them.
Conclusion
Garlic cloves are another one of nature’s miracles. They multiply and bless us with a great harvest at the end of the season. Remember that you can dictate the size of your future garlic bulbs by choosing the biggest, healthiest cloves. My recommendation is not to peel them, soak them or wait for them to sprout – just keep it simple and follow the tips above.


Hi Adriana!
Nice website.
We’ve had avery strange season here in Maine, USA, zone 5. My precious garlic plants, after six years of selective breeding the most wonderful hardneck heads, has suffered greatly. Copious daily rain for weeks has caused them to not grow large and the skins have split.
I’d like to save the genetic progress I’ve made. Is there ANY way to help the bulbs grow successfully (planted this coming fall, or sooner?)? Is there a trick to help protect them from their vulnerability?
Thank you for any advice you can offer! Or even just your empathy.
Hollis Smith
Hi Hollis,
I’m so sorry to hear about the challenges you’ve faced with your garlic plants this season. It’s clear that you’ve put a lot of love and effort into selectively breeding them over the past six years, and it must be incredibly frustrating to see your hard work affected by such unpredictable weather.
Have you considered planting your garlic in raised beds? It will improve drainage and prevent waterlogging, especially in seasons of heavy rain. Mulching with straw or another organic material can also help regulate moisture levels and protect the bulbs from splitting. I would recommend you try row covers to shield the garlic from excessive rain while still allowing for necessary sunlight and air circulation.
I truly hope that your next planting season brings better weather and more favorable conditions. Hope you’re able to preserve the amazing progress you’ve made!