

There are a lot of resources out there saying that leeks don’t freeze well, or that the best way to store them is in a fridge for 7 to 10 days. Leeks are a staple in my winter diet, and the thought of filling my fridge with buckets of leeks is ridiculous!
The good news is that you CAN store leeks for way more than 7 to 10 days and enjoy them in a fresh state for months to come. Why would you want to grow an entire raised bed filled with leeks if there was no way to store them?
Leeks are frost-resistant, and if your winters are mild enough, you can leave them in the ground and harvest them gradually. However, the safest way to store fresh leeks over winter is inside containers filled with sand or garden soil and placed in a cool room, such as a basement or root cellar.
But before you go ahead and start pulling leeks out of the ground, there are a few things you should know about the right way to harvest, prep, and store these favourite alliums:
Harvesting leeks – tips and tricks
The best time to harvest leeks is during late autumn, after the first frost, which for most temperate climates is mid-October or November. Unlike most vegetables in the onion family, leeks are best harvested after they’ve seen a few frosty nights. Don’t worry, they won’t be ruined, in fact, you might notice a sweeter taste and more tender structure.
Leeks do well in mild frosts and even snow, so it’s not unusual for gardeners in mild temperate climates, like the UK, to leave them in the ground and pull them as needed instead of storing them indoors.
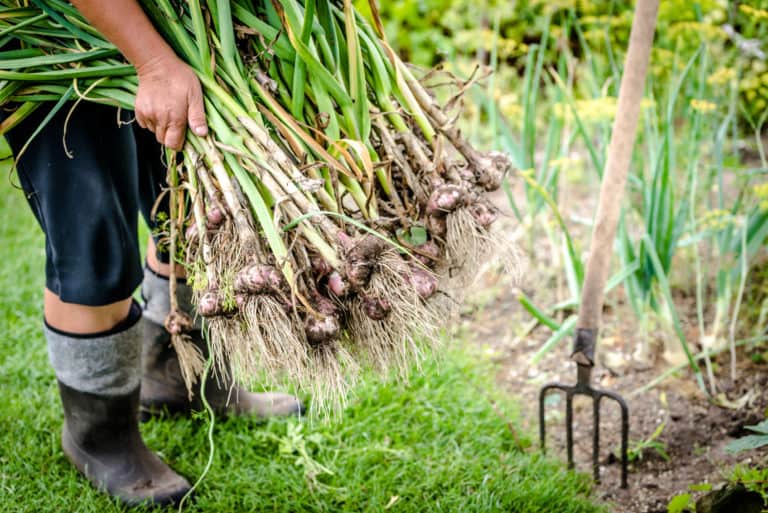
Harvesting leeks isn’t a matter of muscle – you have to be gentle and deliberate. Leeks have incredibly deep and powerful roots, and trying to pull or twist the plant out will most likely result in breaking the stem and leaving the root in the ground. If you’ve grown your leeks in clumps, using the multi sowing method, it’s even harder to pull them out in one piece.
When harvesting leeks, use a garden fork to loosen the soil in between rows and gently lift from underneath the roots. If you feel resistance while pulling the leeks, keep breaking up the soil until you can remove them.
Processing leeks for storage
We all know that the most delicious part of leeks is the white part, but for storing them, we need to keep as much of the plant as possible. Here’s how to prepare leeks for long term storage:
- Grab a bucket and a pair of scissors.
- Trim the leaves off the leek, leaving 6 inches. How you style them is up to you 🙂
- Don’t clean the dirt off the roots or stems.
- Don’t peel the outer layer – you can do that before you eat them.
- Trim the roots to about 1 inch or 2-3 cm.
- Don’t wash them or place them in water.
Ok, so you have your pile of leeks trimmed and ready to go. The next step is getting your containers ready so that you can efficiently pack the leeks in.
Storing leeks in sand or garden soil
You can store leeks in pretty much any container you like – buckets, wood boxes, old planters, etc. I like to keep them in plastic containers with high sides because we’ll be storing them upright and we don’t want them to fall over.
To start, add 5 to 7 inches of sand or garden soil. Sand is widely used for preserving root crops, so it’s a good option for protecting the leeks’ roots. But, if you don’t have sand available, you can just use garden soil. I’ve done this successfully and l actually believe garden soil is a better option.
With garden soil, I noticed the leeks setting roots inside the container, which resulted in fresh leeks for a longer period of time. It’s just a hunch, but I’m guessing nutrients are still available inside the soil, and the leek goes into a dormant state as opposed to drying up or rotting.
Water your sand or garden soil inside the containers, but make sure it’s not too soggy. Don’t lay the leeks horizontally like carrots. Instead, place the leeks upright, sticking their roots into the soil as if you were planting them. Also, pack them close together and you’ll save a lot of space.
Keep the containers in a cool, dark and well-ventilated space such as a root cellar or a cool basement. Ideally, they shouldn’t freeze, but near-freezing temperatures are okay.
How well do leeks keep long-term?
You can definitely store leeks long-term using this method. Leeks can keep in sand or soil inside a root cellar for as long as 3 months. Of course, a 3-month old stored leek will have a few wilted leaves, but it will taste surprisingly buttery and flavorful.
I believe our leeks ran out after 3 months before having the chance to go bad. Here are a few things you can do to store your leeks for longer:
- Grow winter hardy varieties such as Musselburgh or Blue Solaise Leek and harvest them as late as possible – they will last you until spring.
- Sort your leeks by size and place them in categories. Eat the smallest first, then the medium, then the largest. Large leeks keep for much longer than small ones because they don’t dry out.
- Regularly check your bins for humidity and spoiled leeks. Your containers shouldn’t have a lid on them, so you need to supplement the water that evaporates.
Conclusion
Leeks that are stored long-term may not have the same crispy and watery texture as leeks that are freshly pulled from the ground. But despite a shriveling stem and a few dried leaves, I’d much rather have a fresh leek in the dead of winter than no leek at all. Unfortunately, it’s far too cold in my area to leave them in the ground – but if your climate allows it, you can skip the extra work and enjoy nature’s “cold storage.”


I simply wanted to thank you for these marvelous tips and tricks you are showing at this website.
Thanks for reading!
Thanks for the advice on leeks and carrots. I just realized that I followed your advice a couple years ago – leeks in a bucket in garden soil, then put the bucket in a trug with straw in it for a bit more insulation. It went first in a small greenhouse, and then as the temperature fell, into an unheated shed and finally a pantry to get them through a couple weeks of -25C (western Canada). It worked perfectly and I enjoyed every single leek for most of the winter. Thanks again!
Hi Shirleen!
I’m so glad to hear that the advice worked so well for you! It sounds like you gave those leeks the ultimate winter care. I’m thrilled they made it through -25C, and it’s wonderful you got to enjoy them all winter. Thanks for sharing your success story! 😊🥕🌱
Thank you for the very complete information on Leeks!
Hi! 😊 You’re so welcome, happy it was helpful!